Lengthen your Romy bolero? Yes of course!
Hi, I’m An Ca from Flaxfield Sewing, if you like my work you can follow me on My blog and on Instagram.
Do you have that too?
You pin an idea on Pinterest and it will remain there for ages. I have that all the time.
This is one of my pins:

Thanks to the beautiful Romy Set from George and Ginger I can delete this item of my list.
I made my own Pinterest inspired sweater and I’m so proud on it, that I would love to share my hack with you today.

What do you need to make this hack?
And off we go …
First print the pattern in your own size and assemble it. You need all the different pattern parts, except the Gathered Bolero back.
We start with the making of the front pattern part.
Take the Tank Front. Lengthen the rounded bottom line of the flowy tank (yellow line) with 2,5 inch. We use the side seam from the fitted tank.

Now you can take the Simple Bolero front and line it up with the tank at the bottom of the armhole (where the point of the scissors is located).
Stick both pattern parts together with adhesive tape as in the photo.

Take the Gathered Bolero Front. This pattern piece has a beautiful rounded bottom. We use this round bottom line to draw the bottom line of our new front piece.
Line up the bottom side seam from the Gathered Bolero with the right bottom point of the tank.
Draw a line at the bottom side of the bolero.


Connect this line with the upper left corner of your shoulder.
Cut out your new pattern piece. The front is ready!


Now we can start to modify the back.
Take the tank top back. Lengthen the rounded bottom line of the flowy tank (yellow line on the photo) with 2,5 inch. We use the side seam from the fitted tank.
Add 1 inch on the left, at the fold line. This will give you a little more room in the back.

Take the Simple Bolero back and line it up with the tank at the bottom of the armhole (where the red circle is on the photo).
Stick both pattern parts together with adhesive tape as in the photo.
Cut out your new pattern piece. The back is ready!

We will now make the bands for the front and back pattern parts . I used the same width as the width of the original bottom band from the unlined simple bolero.
To know the length of your bands you measure the rounded side of your front, that’s the length you need. Cut this band 2 times out of your fabric. Measure the bottom of the back. Cut this length 1 time on fold out of your fabric.


Cut all your other pattern parts out of your fabric.
You will have: 2x sleeves, 2x front, 1x back on fold, 2 front bands and 1 back band on fold.
Fold your bands lengthwise an sew them on the front and back pieces, right sides together. Topstitch if desired.
Lay the two front pieces on each other, right front piece has to be on the top. Line up both pieces nicely and baste them together at the shoulders and at the neckline.
Close the shoulder seams.
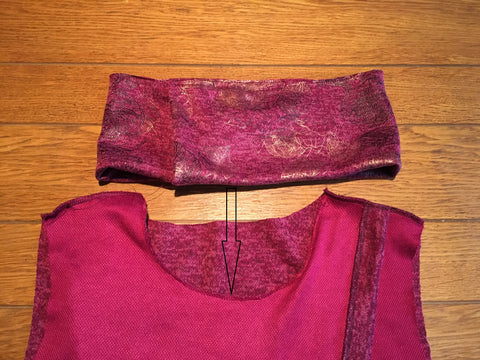
Now we are going to make the cowl.
Measure the neck circumference.

My Neck circumference is 25,5 inch. I added 4 inch to this length for the overlap of the cowl (3,5 inch) and the seam allowance. The width of my cowl pattern piece is 10 inch. I made a pattern piece of 14,75 inch (on fold) by 10inch. Cut this out of your fabric.

Fold your cowl in half, lengthwise, right sides together. Sew the short ends. Turn right sides out.

Overlap the collar by 3,5 inch, you can choose witch side you want to be on top. Baste together.

Sew your cowl on your neckline. Right sides together.


Your cowl is done!

You can now sew in your sleeves and close the side seams (look at the instructions 😊).
Well done, you’ve made it 😉. Enjoy your beautiful work!

I hope you also love this hack.
Until next time!
X
An Ca


21 comments
http://mewkid.net/when-is-xuxlya/ – Buy Amoxicillin Online Amoxil bro.gjhh.georgeandgingerpatterns.com.pxc.lz http://mewkid.net/when-is-xuxlya/